Padlet Tutorial for Teachers

Padlet is a simple, yet powerful tool that should be in every teacher’s remote learning toolkit. Used intentionally, Padlet can increase participation, help retain a sense of class community, make student thinking visible, and emphasize to students that the work they do matters. 

1. Why Teach with Padlet?

Padlet is essentially an online bulletin board where students can post content. What makes it so powerful is the fact that students can upload any type of media imaginable (images, videos, drawings, web pages, gifs, embedded screencasts, and more), see each other’s posts in real time, and then comment on each other’s work.

Having students post their work for their peers rather than just handing work in to their teacher also lays the groundwork for a more transformative philosophical shift. Establishing a class culture where students share work with others helps them understand that the work they create matters, and is meant to be seen. This simple, yet vital shift can help increase engagement, buy-in, and self-determination in students. 

2. Settings Suggestions for Padlet

Since Padlet isn’t exclusively an educational tool, I recommend making the following settings changes before you assign one to your students: 

  • Turn on Attributions to ensure that author names show up on each post
  • Turn on Comments so that students are able to comment on each other’s posts 
  • Leave Reactions turned off: you don’t want your bulletin board to turn into a race to get the most likes 
  • Turn on Require Approval under Content Moderation to ensure that you are in full control over the content that shows up on the class board (if you do this, make sure you are actively monitoring your board so posts aren’t hanging in the lurch) 

3. How to Use Padlet in the Classroom

Although there are many ways to use Padlet, the three following purposes are a great starting point: 

  1. Introduce a Topic: During the engage phase of a lesson, I often have students post to Padlet to share prior knowledge or anticipate future learning. If, for example, students are going to be learning about a historical controversy, I might have students create a post about what controversies they already know about. Or, if we are going to be studying how geography impacts human settlement, I might have students post a picture of a place in the world where they would choose to build a village, and then explain why. Or, sometimes I will set up a digital KWL for students to post what they know, want to know, and what they learned about a topic. 
  2. Make Thinking Visible: Padlet is a powerful active participation tool that can give you a clear picture of student understanding. During math class, students can use the drawing tool to show the steps to a problem. If students are working on writing a thesis, they can all post drafts of their writing and give each other feedback. 
  3. Showcase Work: Whether during remote learning, or in the classroom, Padlet is my favorite tool to use for students to publish their finished work. Publishing work is an important last step because it communicates that the work they just put so much effort into has value beyond just getting a grade. Publishing work helps instill a sense of pride in one’s work, ownership over one’s own learning, and can lead to higher levels of student engagement. 

For additional ideas, be sure to check out this other post: How to Teach with Padlet

4. Padlet Nuts and Bolts

Padlet offers a Basic version and a Pro version. There’s also an option to get a school-wide account, called the Padlet Backpack.

The difference between Basic and the Pro version is the number of bulletin boards that you can have running at one time, as well as the overall storage space. I used Padlet Basic for years and I think it’s totally okay to just use the free version as long as you plan to run more than three boards at a time. I’ve since decided to purchase Pro access because I use it so often, but I’d recommend you at least give it the full trial run before making that decision.

To get started click on ‘Make a Padlet.’ Then you’ll be given some options for how you want to format your Padlet. I usually teach with either the Wall, the Grid, or the Shelf. Since I use the Wall most often, I’ll show you how to use Padlet with that option. 

Padlet Dashboard - Wall Board

Let’s start by taking a look at how you can set it up and customize Padlet to best fit you and your students’ needs.

First, you’re going to want to give your Padlet a name. Then you can write a more detailed description about what your bulletin board is about.

Padlet Title and Description

Then you’ll see that you can customize the wallpaper, which is essentially the background of your bulletin board. You can make the background a solid color or a gradient color, though my personal favorite is to pick from one of the textures and patterns. Lastly you can set a picture as the background. Here, you can choose from one of the pictures that’s already in Padlet or you can upload your own.

Padlet Backgrounds
Padlet Backgrounds

Next you’ll see that the default setting is for post attribution to be turned off. I like to have my students sign in to create free Padlet accounts and then have their name included, so I’m able to see who posted, so I almost always turn post attribution on.

Turn On Padlet Post Attribution

Next you’ll see that you’re given the option to turn on comments. In my opinion one of the most powerful aspects of Padlet is the ability for students to communicate with each other about the work that they’re sharing, so I also usually turn comments on.

Turn On Commenting in Padlet

Next, you’ll see that you also have the option to allow students to give each other different types of reactions. If you turn on reactions, students will be able to do things such as like each other’s posts. Whenever I’ve had reactions turned on, it turns a little bit too competitive and students tend to focus a lot on how many likes they got, so I usually keep this function turned off.

Reactions in Padlet
Reactions in Padlet

The last setting you’ll want to pay attention to is whether or not you want to require approval before something gets posted to Padlet. If you have this turned on, posts won’t show up on the board for the rest of the class to see until you approve them. The obvious benefit of doing this is you have greater control over what shows up on your bulletin board. The downside, however, is that if you’re not monitoring Padlet and approving posts quite regularly, it loses some of its functionality, since a major benefit of using Padlet is for students to be able to see each other’s responses in real time.

Require Approval in Padlet

When you’re done setting up your Padlet, click ‘Next,’ and then to get started, click ‘Start posting.’ If you ever need to access the settings menu again, all you need to do is click on the settings icon at the top and you can go back in and change anything that you need to.

Ready to Post in Padlet

In order to create a new post, click on the add button on the bottom right-hand side of the screen. Here you’ll see your post pop up on the bulletin board and you can start by writing a title for your post.

Creating Posts in Padlet

Beneath the post you’ll see all the different options for the types of posts that you can make. One very common way to use Padlet is to have students type a quick answer to a question.

Post Menu in Padlet
Post Menu in Padlet
Text-Based Posts in Padlet

If you’re using Padlet to have students showcase work that they created in another program, they can do that by uploading a file that they’ve downloaded onto their computer and adding it to Padlet. Once they upload that work, they can also write a short description explaining what it is.

Posting Final Work to Padlet

Next, you’ll see that students also have the option to include a link to another website. This could be useful for a research project if you want to have students collaboratively look for different sources and then share them on Padlet for the rest of the class to see.

Adding a Website to Padlet

Next, if you click on the search icon, you’ll see a search box pop up where students can look for different types of media that they might include in their post. First students would enter a search term and then they could look for images, videos, GIFs, audio, or another website.

Google Search for Media in Padlet

I love including GIFs on Padlet or on my Google Slides just to infuse a little bit of humor and fun into my lessons, so here I’m just going to search for the term “excited” and then when I add that to my Padlet, you’ll see the GIF show up on the bulletin board. Encouraging students to add GIFs can be a great way to supplement a text-based answer that they provide and make it a little bit more exciting and engaging for your students.

Insert GIFS in Padlet

Next there’s also a camera option, so here students would be able to take a picture using their webcam and then upload that image to Padlet. Having students take pictures could be a great community building tool. You might have students do things like take pictures of their favorite objects or of their pets and then upload those to the bulletin board for the rest of their classmates to see.

Camera in Padlet
Camera in Padlet

Next in the drop-down menu you’ll see that there are even more options of different types of files that could be included on the bulletin board. In addition to images, students could also capture video through their webcam and upload it to Padlet.

You could also have students record audio files. If you were interested in doing something like a class podcast or students were sharing about their experiences, but you didn’t want to go through the whole process of actually creating a podcast, you could emulate that experience by having students post short audio files about a personal experience that they’re having with remote learning. Or they could even do a quick interview with a family member and then add that audio file.

Record Audio in Padlet

The last feature I’ll show you is the draw function, which allows students to draw something and then post it. Here you could have students visualize something that they’re learning, or if you teach math they could show the different steps to a math problem. 

The Padlet Draw Tool Examples

Once you’re ready to share that Padlet with your class, click on ‘Share.’ I would suggest that you either copy the link, email the link, or just post the Padlet directly to Google Classroom. I usually choose to copy the link and then embed that link into another assignment that I’ve created. To do that, go ahead and click ‘Copy Link.’

Copy Padlet Link to Share

5. The Student View of Padlet

Now that you’ve learned some Padlet basics, let’s look at what a Padlet assignment looks like on the student end.

First you’ll notice that if a student clicks on the link that you gave them, they can still access the Padlet and also post to it without even signing up for an account. As I mentioned before, I do like to have my students sign up so that their name shows up on all the posts that they put on Padlet. To do that, students click on ‘Sign up,’ choose the email address to create their account with, select ‘Basic Plan,’ and then they have an account. Exactly like the post you created yourself, students will click on the add button to add their own post.

If you turned “Require Approval” on, you’ll notice that right below the post that it says it still requires approval. As a reminder, that means that that post is not going to show up on the class Padlet until the teacher actually approves it.

Student Post Pending Approval in Padlet

Next, notice that the student is able to comment on other posts on the board. 

Commenting on Posts in Padlet

Back on the teacher page, you’ll be able to see the post that the student made, and when you click ‘Approve,’ that post will be visible for everyone else in the class to see as well.

Once a student posts, you can also interact with them by leaving a comment.

Approve a Student's Post in Padlet

6. Conclusion & Resources

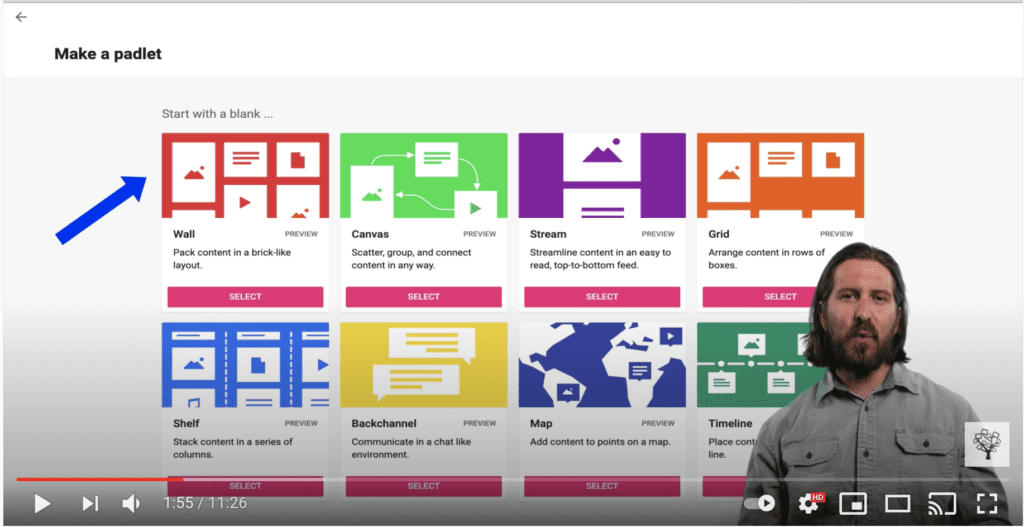
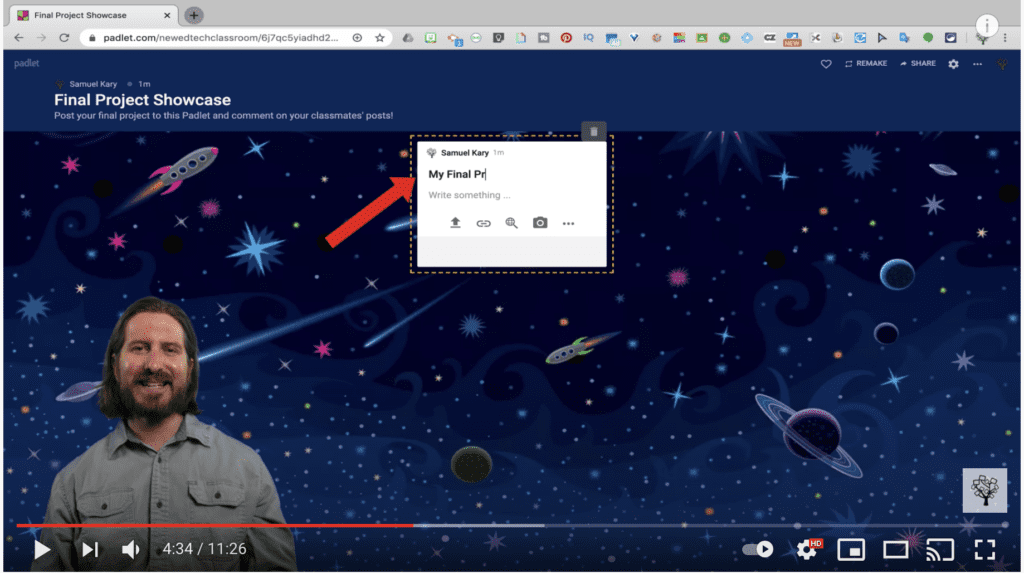
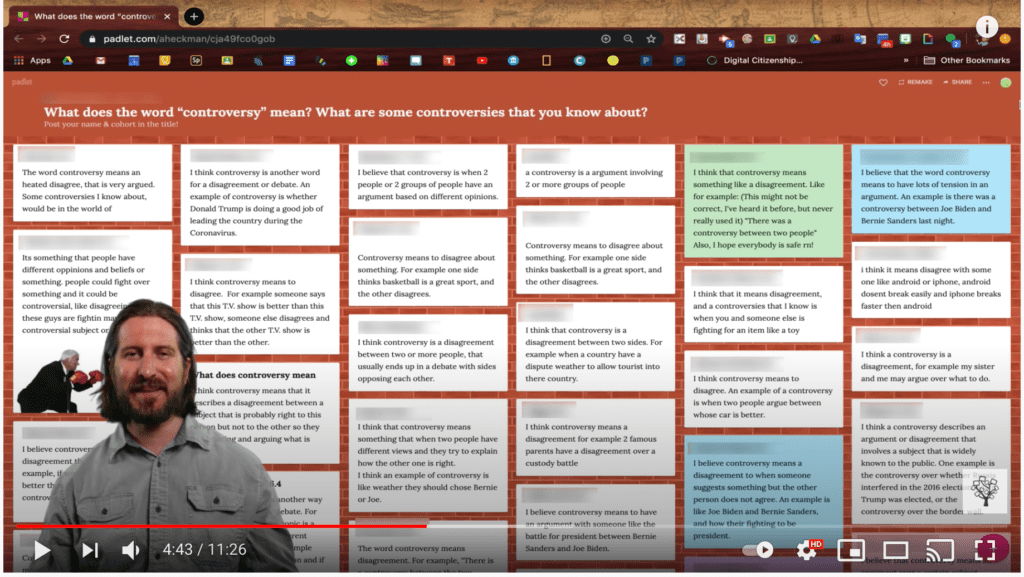
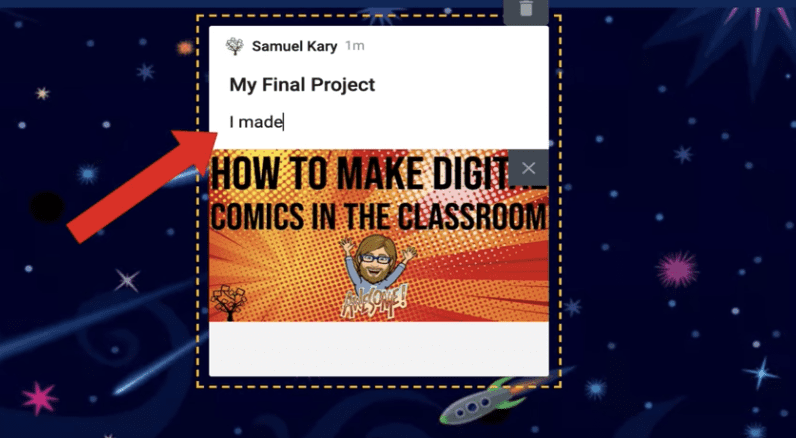
Padlet isn’t the only way to build community, make student thinking visible, or demonstrate to students that the work they do matters, nor should it be. But given its low barrier to entry, dynamic platform, and free to low cost, Padlet should be a part of all teachers’ toolkits, whether teaching remotely or in a brick and mortar building with your students.

For additional strategies for how to use technology to personalize learning, increase engagement, foster creativity, and more, click here: 

How to Use Education Technology: The Ultimate Guide

And to read more about why I believe technology must be a central part of public education today, click here:

Why Education Technology?: The Ultimate Guide

Interested in the software I use to create my videos? Check out the links below! Many of these products offer a free trial to start and just clicking on the link helps to support The New EdTech Classroom!

Screenflow is a dynamic, intuitive video editing software that I use to create all of my YouTube videos. They’re currently offering a free trial! Get more details here.

I use Adobe Spark Post to design all of my YouTube thumbnails, as well as all my social media graphics. More information here.

If you’re interested in creating a website, these are a couple of programs I personally use and highly recommend: Bluehost is a web host that offers a professional platform for your website. You can check them out here.

Elementor is a powerful tool that helps with clean visual design for your website as well as marketing to further your website’s influence. More details here.  

Facebook
Pinterest
Twitter
LinkedIn
Email

Struggling to reach today's learners?

Find out which 21st Century Teacher skills you need to level up.